
Plants can live in pots with no drainage holes, but the pot gives you no margin for error. Every drop you add stays inside, and the roots at the bottom end up sitting in it. The safe route is to keep drainage in the system somewhere, as a cachepot or a drilled hole, and the rest of this guide is for the cases where you cannot.
Why drainage matters
Roots need air as much as water. When a pot holds standing water, the potting mix stays saturated, air is pushed out of the pores, and roots die or stop working, so the plant looks wilted even though the soil is wet. University of Connecticut Extension advises emptying saucers and cachepots within about an hour of watering for exactly this reason.
Even a pot with holes has a soggy layer at the bottom: water drains until gravity and the soil's pull on water balance. The holes keep that layer thin. Without a hole it keeps growing every time you water.
Three setups, best to worst
Pot with a hole
Best for the plant
Empty the saucer within an hour.
Cachepot
Safest hole-less setup
Lift out, water, drain, return.
Planted straight in
Highest risk
Every drop stays, so measure the water.
1. Use the pretty pot as a cachepot
Leave the plant in its plastic nursery pot and set that inside the decorative pot. This is the safest way to use a hole-less pot, and it makes watering easier.
- Raise the inner pot. Stand it on an upturned saucer or a few pebbles so its base never sits in water.
- Water at the sink. Lift the plant out and water thoroughly until it runs freely from the holes.
- Let it drain for 10 to 15 minutes.
- Put it back. Pour off any water that has collected in the outer pot, now and after each watering.
2. Drill a drainage hole
If the pot is ceramic or terracotta and not a valuable piece, a hole makes it a normal pot. Put a cross of masking tape where the hole goes so the bit does not skate, use a ceramic and tile or diamond bit, keep the speed low, drip water on the spot, and wear eye protection. Do not try it on glass, crazed or antique pots.
3. Plant directly and measure
This is the highest-risk option. Choose a pot only slightly larger than the root ball, because a pot that is too big holds more water than the roots can use. Use an open, fast-draining mix (see DIY potting mixes and the soil mix calculator), and water in small, measured doses (see below). Pick plants that like even moisture rather than drought-adapted ones; succulents, ZZ and snake plants are the first to rot in a sealed pot. Salts also build up with no drainage to flush them, so expect to repot into fresh mix once a year.
The gravel-at-the-bottom myth
The old advice to put gravel or broken pot pieces at the bottom for drainage does not work. The classic explanation is that water does not move easily from fine soil into a coarser layer below it, so it waits at the boundary until the soil above is saturated, which would lift the wet zone toward the roots. A 2025 container experiment tested gravel, LECA, grit and sand layers under three potting mixes and did not find extra wetness: drainage layers almost never increased how much water the mix held and usually reduced it. The study measured water retention, not plant growth. Taken together, the evidence is that a gravel layer neither fixes drainage nor adds any benefit; it only takes up pot space, and it is no substitute for a hole.
Plain mix, with a hole
Wet zone at the bottom
A tall air-filled root zone above it.
Gravel layer, with a hole
Same wet zone, lifted up
Less soil, shorter air-filled root zone.
How much to water a pot with no hole
Advice varies. Growers' rules of thumb start around one tenth of the pot's volume per watering and warn against going past roughly a quarter to a third, because the surplus has nowhere to go. The table converts that into numbers for common pot sizes. Treat it as a conservative starting point, not a measured standard.
| Rim diameter | Approx. pot volume | Starter dose (10%) | Never more than (25%) |
|---|---|---|---|
| 10 cm (3.9 in) | 485 ml | 50 ml (1.7 fl oz) | 120 ml (4 fl oz) |
| 12 cm (4.7 in) | 840 ml | 85 ml (2.9 fl oz) | 210 ml (7 fl oz) |
| 15 cm (5.9 in) | 1.6 L | 165 ml (5.6 fl oz) | 410 ml (14 fl oz) |
| 17 cm (6.7 in) | 2.4 L | 240 ml (8.1 fl oz) | 600 ml (20 fl oz) |
| 20 cm (7.9 in) | 3.9 L | 390 ml (13.2 fl oz) | 975 ml (33 fl oz) |
| 25 cm (9.8 in) | 7.6 L | 760 ml (25.7 fl oz) | 1905 ml (64 fl oz) |
Assumes a tapered pot whose base is 70 percent of the rim width and whose height is 85 percent of the rim width. Real and decorative pots vary by about 20 percent, and straight-sided pots hold more. To measure yours, fill it with water and pour that into a jug.
- Check first. Push a chopstick or skewer to the bottom next to the pot wall. Dry on the way down means the plant can take a drink; damp or muddy means wait.
- Pour a starter dose, slowly and evenly over the whole surface so it spreads instead of pooling at the bottom.
- Wait 30 minutes, then probe again. If the lower soil is still dry, add a second small dose; never exceed the ceiling.
- Lift the pot after a few waterings to learn its weight when it needs a drink and when it is wet.
Warning signs and what to do
- Sour or swampy smell, soft stem base, yellowing lower leaves: the roots are suffocating. Tip the pot over a sink to pour off the water, let the mix dry, and check the roots, following the root rot guide.
- Fungus gnats or white mold on the soil: the surface stays wet too long; see fungus gnats and mold on soil.
- White crust on the soil or pot rim: salt buildup. Repot into fresh mix.
The whole decision in one chart
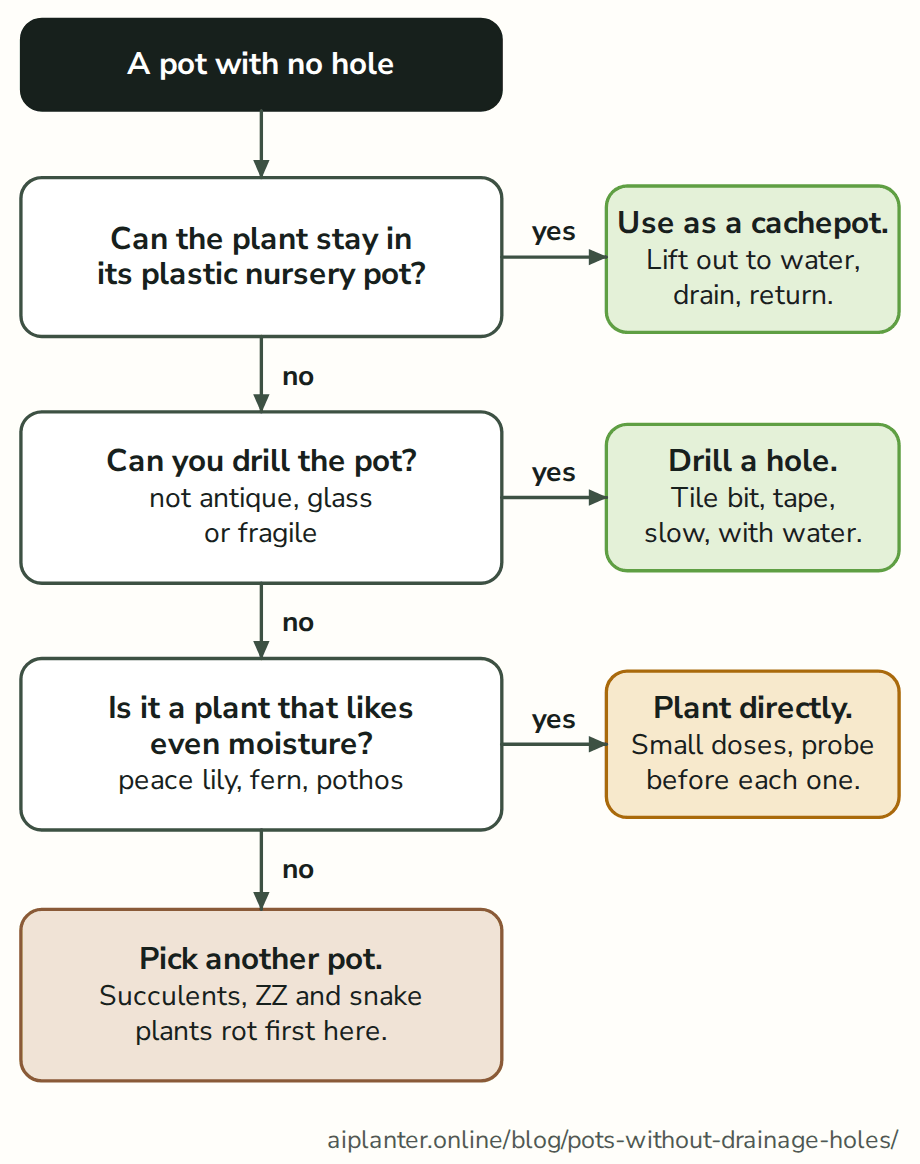
Read this figure as text
- You have a pot with no drainage hole. Can the plant stay in its plastic nursery pot? Yes: use the hole-less pot as a cachepot. Lift the plant out to water, let it drain, then return it.
- Can you drill the pot (not antique, glass or fragile)? Yes: drill a hole with a tile or diamond bit, slowly, with water, using masking tape to hold the bit.
- Is the plant one that likes even moisture, such as a peace lily, fern or pothos? Yes: plant directly, but give small doses and probe the soil before each one.
- Otherwise pick another pot. Succulents, ZZ plants and snake plants rot first in sealed pots.
Frequently asked questions
Can I put a plant in a pot without drainage holes?
Yes, but it is the riskiest option. The safest way is to keep the plant in its nursery pot and use the hole-less pot as a cachepot. Planting directly works only with careful, small, measured watering and a plant that tolerates even moisture.
How do I drill a drainage hole in a ceramic pot?
Stick a cross of masking tape where the hole goes, use a ceramic and tile or diamond bit at low speed, drip water on the spot as you drill, and wear eye protection. Do not drill glass, crazed or antique pots; use those as cachepots.
Does gravel at the bottom of a pot help drainage?
No. The classic explanation is that water waits at the boundary between fine soil and coarse gravel until the soil above is saturated, and a 2025 container study found drainage layers almost never increased water retention and usually reduced it. Either way the layer only takes up pot space; use a hole or a cachepot instead.
How much water should I give a plant in a pot with no drainage?
Start around 10 percent of the pot's volume, add it slowly, wait half an hour, and probe the soil with a chopstick before adding more. Do not exceed about a quarter of the pot's volume in one watering.
What happens if water sits at the bottom of the pot?
The soil there stays saturated, air is pushed out, and roots die or stop working. The plant then wilts, yellows and may rot at the base even though the soil is wet.